"Hey Jude ... take a sad song & make it better!" - the Beatles

My goal is to turn my disabilities around to abilities using art therapy as a means of stroke rehabilitation on my hands & arms. I want to also use cards to spread kindness, show different fun card techniques, bring awareness to issues that are important to me, and to just spread joy in general!

Saturday, December 24, 2016

Skating By

Well, today is my Holiday card for my fourth kid - my only boy.  Yes, I had four teenagers at the same time - and three of them were girls!!!  Oye vey!!!!  The insanity of it all!!!  Haha!  They are all grown now, so I am good.

Card for my boy - love the skating polar bear!

Anyway, I mentioned before that I was doing a special card for each of them this Holiday season and posting it here on the blog.  I did the three girls first and now I am doing my boy (that is not the order of age by the way!)  So, originally I was looking for a bacon stamp set because this one loves bacon!  I saw a few cute ones but they just didn't "spark" for me.  Then, I really wanted to do "Horton" from Horton hears a Who because when he was little he saved up his money and bought me a Horton in baby blue (my favorite color) and I still have it on the shelf next to my bed.  I actually couldn't find a stamp set for that and I am not that great with digital images so it was on to the next idea!  Well, he is a hockey player and we are a hockey family so I thought that the My Favorite Things Polar Bear Pals stamp set with the polar bear skating would be cute - and that is what I went with!

Close up of the cute skater card!

I started with a Simon Says Stamp pre-cut side folding card base in the A2 size.  I then used the My Favorite Things Polar Bear Pals stamp set and stamped it with Memento Tuxedo black ink and proceeded to color it in with Spectrum Noir alcohol markers in grays and blues.  I also used the My Favorite Things Stepped Up Chevron die and cut pieces of Simon Says Stamp card stock in Sea Glass, Audrey Blue, and Surf Blue as well as a piece of silver mirror card stock from my Love from Lizi card kit to add some movement to the card.  I used a Merry Christmas sticker also from my recent Love from Lizi card kit for the top of the card in a beautiful silver color.  I then attached the little skating guy with some foam tape and added some wink of Stella for some sparkle.  Finally, I added the sentiment in Tim Holtz Distress Ink in Broken China to match all of the colors.  I really think it turned out to be a fun card!

Supplies for the skating polar bear card!
Love you more than I can bear!


I am excited to give this little card to him as he always makes me happy and smile and I truly do "love him more than I can bear"!!!  Hope you enjoyed this short post and that you have a wonderful Holiday!  Jude  :-)
_________________________________________

Social Media Links: (Please visit me for more fun art therapy!)
YouTube - Click HERE!
Hey Jude Cards Instagram - Click HERE!
Jude U Personal Instagram - Click HERE!
Snapchat Username - judeunnone
See you there!  Thanks!
_________________________________________
LINKS:
Polar Bear Pals Stamp Set - Click HERE!

To order the Simon Says Stamp monthly kit - click HERE!
For more information on the Love from Lizi kit - click HERE!
_________________________________________
Supplies:


Friday, December 23, 2016

Cookie Cutter Christmas

I absolutely love this set!  To be honest though, I forgot that I had it or I would have been making cards with it this entire Holiday season!!!  I love it for the versatility - you can make a Santa, and Eskimo, a bear, a reindeer or a gingerbread man/woman - fun!!!  And, there is lots of accessories and cute sentiments as well.  But, the best part about it is the punch that goes with it!  I didn't realize how much I liked punches until I had done an entire season of dies through my die cutter!  When you have hand problems, it hurts!  I have to get the automatic power extension to my We R Memory Keepers Evolution die cutter and I will be okay; in the meantime though, there are my Stampin' Up punches!  Oh, one more awesome thing about this set is that there is a Halloween stamp set that goes with it also - so versatile!!!

Cookie Cutter Christmas - Santa!!!

So, I started these two cards with some Simon Says Stamp card stock that I cut down to a A2 top folding and A2 side folding card.  I then stamped all of the little characters onto some white card stock with either Memento tuxedo black (for the ones that I wanted to color in) or a variety of Avery Elle Kraft, Avery Elle Tuffle, Stampin' Up Creamy Caramel and Stampin' Up Chocolate Chip inks.  I wanted to have a little bit of a color difference for my gingerbread guys/girls!  I then colored in the other images with my Spectrum Noir alcohol markers in DR1, DR2, FL3, CG1, CG2, CG3, FS1, IG1, TB1, CR2 and the Blender.


For the Santa card I used some patterned paper from Pink Paisley in Yuletide.  I cut about an inch off of the side of the front of the card and glued the three little Santa's in a row.  I added the patterned paper to the inside of the card in a one inch strip and then added a white stripe sticker from the Love from Lizi kit.  I then used the Tim Holtz clear ink and the Hero Arts white embossing powder to heat emboss the sentiment.  I also added some wink of Stella to the fur on all of the Santa's costumes.  Finally, I added some sequins to the card from the Snowflake mix from Pretty Pink Posh that I had in my stash to give it that final punch.  Love it!!!!

Supplies for the Santa cards.


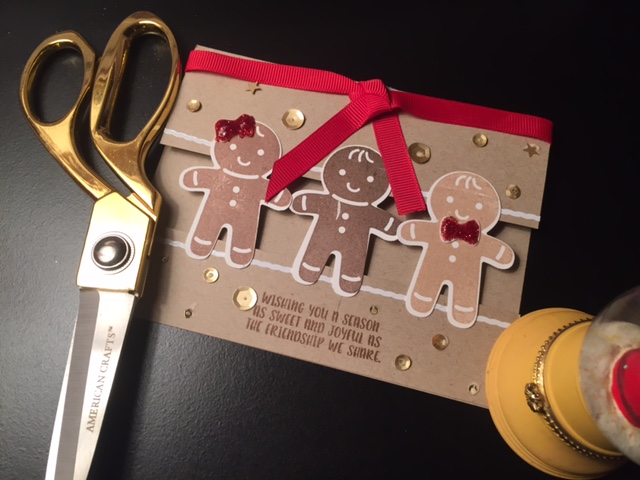
For the Gingerbread card, I took three gingerbread in differing shades of brown (mentioned above) and then cut the kraft cardstock in half - actually I cut out about 1/3 of the card stock so there could be an opening.  I used the same white rope stripe stickers from the Love from Lizi card kit to accent those two pieces and then I used the three gingerbread to hold the card together.  I added a bow to the hair of one and the neck of another for a little punch and used glitter stickles to make them sparkle!  Finally, I used some sequins from the Reindeer sequing mix from Kat's Scrappiness.  I just love how this turned out as well.

Cute little gingerbread Cookie Cutter cards!

Supplies for the gingerbread cards.

Now I am off to try to get all of the cards that I made over this season mailed (Yes, I'm late because I have had the flu)!!!  Hope you enjoyed and hope that you have the most wonderful holiday!  Jude  :-)

Side view - you can see how the gingerbread hold the card together - fun!

PS  If you are interested in the stamp set from Stampin' Up, they are available on the web site linked - and the Halloween one that goes with this set is being discontinued and is on sale!  There is also a brand new catalog coming out right now and it has some awesome things in it - I will do a haul here soon!  Thanks!
______________________________________________

Social Media Links: (Please visit me for more fun art therapy!)
YouTube - Click HERE!
Hey Jude Cards Instagram - Click HERE!
Jude U Personal Instagram - Click HERE!
Snapchat Username - judeunnone
See you there!  Thanks!
______________________________________________
LINKS:


Stampin'Up - if you are interested in anything from Stampin'Up - click HERE!!
To order the Simon Says Stamp monthly kit - click HERE!
For more information on the Love from Lizi kit - click HERE!
____________________________________

Wednesday, December 21, 2016

Coloring Cards - A Gift

I realized today that I needed a couple extra gifts either bought or made - so, I decided to make them!  I saw a post that Jennifer McGuire did recently on a way to do these types of cards as a gift so I thought I would give it a go.  They turned out so cute and I loved the personalized factor.  I even made sure that the back was generically personalized so that, once the card is colored and sent, the receiver knows how much time, love, and kindness that the person put into the card!  That is what giving cards is all about, right?  Spreading kindness.

Final sets all ready to go!
So, I started with some white card stock and two different stamp sets that I knew had open designs so that, once they are stamped, they can be colored in.  I made sure to use my Memento tuxedo black ink so that the person who colors it is able to use whatever medium they want for coloring.  I am sending some colored pencils along as well.  


All the stamping in the final set, including the back.

I used the Concord & 9th You're My Person stamp set and the Waffle Flower Doily Circle stamp set to create all of the cards.  I started with the Concord & 9th set and my mini MISTI.  I placed the flower where I wanted it to be on all of the cards and the proceeded to stamp about 10 of them.  I stamped all of them at least two times - some needed a bit more than others.  That MISTI saved my life!!!!  I love it!

Stamp sets used for the coloring cards gifts.

Next, I used the Waffle Flower Doily Circle clear stamp set and I set it off to the side a bit to give a little more edgy look to these cards.  I also added a banner at the bottom so the person sending it can put their name, a sentiment, whatever they want in it.  I again used the MISTI and did about 10 of these as well.  I actually had to stamp this one about three times each so I am just in Heaven over the MISTI tool!

I then took the small Technique Tuesday Random Act of Cardness mini stamp set as I wanted to personalize the back so that the eventual recipient would know that the person sending it put a lot of time and effort into it with their coloring!!!  I wanted it to be generic though so I thought this was the perfect set to use.  I used the envelope and a sentiment for the Concord & 9th cards and stamped them in Memento Paris blue ink for a slight variation.  On the Waffle Flower cards I used the happy face and a different sentiment to ensure there were variations between the two cards.

Close up of a final gift set ready to go!!!

I finally packaged them up with two of each type of card along with a pack of colored pencils and ribbon from Stampin' Up.  They turned out to be the cutest card sets and I hope they create lots of fun.  I can't wait to give them out!

I even made one for myself and started to color it and get it ready to go out the door!

Hope you enjoyed and I will see you soon for another post.  Happy Holidays!!!  Jude  :-)
_____________________________________________

Social Media Links: (Please visit me for more fun art therapy!)
YouTube - Click HERE!
Hey Jude Cards Instagram - Click HERE!
Jude U Personal Instagram - Click HERE!
Snapchat Username - judeunnone
See you there!  Thanks!
_____________________________________________
LINKS:
Stampin'Up - if you are interested in anything from Stampin'Up - click HERE!!


Holiday Tags - Volume Two

Here we go - ready for round two on the holiday tags!  Yay!  I definitely have made more than these eight tags, but I thought, since these were for a special project, I would just share these.  I hope that you get some fun ideas that you can incorporate for some of your own projects.  And, as always, just keep having fun and doing the things that make you happy!

All four tags for this batch - sorry about the lighting on the right :-(

As with the first tags, I used a majority of the same products.  I used the Prima watercolor tags because they are large and I was able to do more with that.  I then colored the majority of the images in with the Spectrum Noir alcohol markers.  I also used tombow mono liquid glue and foam tape to attach all the images.  To decorate, I used various colors of Wink of Stella and Tonic Nuvo drops.  They just added so much to each of the cards!  Most of the ribbons were from the Love from Lizi kit that I recived and I'm just trying to use up my supplies.  That said, here we go!!!!


With the first tag in this batch (or tag 5 for the project) I used an Art Impressions stamp that had three little penguins caroling and holding the word JOY!  So cute!  I colored them all in and added sparkle where I wanted.  I used another stamp from the set to draw your attention up to the two cute mini tags that I included at the top.  Those papers were from past Simon Says Stamp kits and I used the Love from Lizi ribbons.  I added a snowstorm of blue and white Tonic Nuvo drops.  Fun!

Cute little caroling penguins tag!

Supplies for penguins tag.

For this tag I used this adorable stamp set by Gerda Steiner Designs called Snow Angels.  All the little critters in this set are making snow angels in the snow!  This totally made my day and made me happy!  I colored the images in with my markers and then I wanted to add a feeling of them laying in the snow making those angels, so I added the footsteps that are included in the stamp set.  Then, I used the Tonic Nuvo drops to go around the waving arms and feet and the footsteps.  I also added some blue snowflakes from my Simon Says Stamp Cute Snowflakes set.  For the tag on this one I used a snowflake from the Love from Lizi set.  Just addorable!

Making snow angels tag!


Supplies for snow angels tag.

For this tag I wanted to center it around the cute polar bear from the My Favorite Things Polar Bear stamp set.  I stamped him at the bottom of the image and created a little snowmound for him to sit on.  I then created a "tag within a tag" look by making a shaker tag from my Queen & Co tag kit and adding that to the top of this larger tag.  The sequins in the shaker mix had stars in it, so I included stars in the colors to match the paper used on the shaker tag by stamping those with my Avery Elle inks.  I also included the sentiments Joy and Noel.  I then added the drops of snow with the Tonic Nuvo drops and I just love how this one turned out!

Polar bear and shaker tag - so much fun!

Supplies for polar bear shaker tags.

I wanted to use the My Favorite Things Yeti stamp set for a tag and here is where I got to do it.  I also made a few cards with it and those are posted on my Instagram if you are interested in seeing them!  I started by creating some "land" for them to stand on and having some in the forefront and some in back.  I used the trees to create this illusion as well.  I then stamped and colored the Yeti from the stamp and attached them to the tag.  I used the negative piece of a cutout from the Simon Says Stamp Season's Greetings die as the tag topper and tied that on with some ribbon to give it a little punch.  I then only added the Tonic Nuvo drops to the little package that they one Yeti was handing the other.  This simply had me smiling the whole time!

Adorable Yeti tag!

Supplies for Yeti tag.


So, that is it - that is the final of the Tag Project I did.  As I mentioned in the videos, this is going to one of my friends and I am hopeful she likes it.  I did make other tags for other gifts, but figured you would be all tagged out so no more videos on those!  I do have a couple more videos coming before Christmas (hopefully) so stay tuned.  After Christmas I will turn to New Years cards - fun, fun, fun!!!!

Thanks again for being here and sharing in my art therapy journey!  You're the best!  Happy holidays!  Jude  :-)

_______________________________________

Social Media Links: (Please visit me for more fun art therapy!)
YouTube - Click HERE!
Hey Jude Cards Instagram - Click HERE!
Jude U Personal Instagram - Click HERE!
Snapchat Username - judeunnone
See you there!  Thanks!
_______________________________________
LINKS:

Stampin'Up - if you are interested in anything from Stampin'Up - click HERE!!
To order the Simon Says Stamp monthly kit - click HERE!
For more information on the Love from Lizi kit - click HERE!